
Installing Windows 11 On Laptops or Desktops Using Windows Official Boot Tool
Prerequisites:
A computer compatible with Windows 11 system requirements. A USB flash drive with at least 8GB of storage capacity.
Stable internet connection (for downloading the Windows 11 ISO file). Back up important data before proceeding with the installation.
Follow these step-by-step instructions:
Step 1: Download the Windows 11 USB Boot Tool
Go to the official Microsoft website or trusted sources to download the Windows 11 Installation Media Creation Tool.
Click on the download link and save the tool to your computer.
Step 2: Create a Bootable Windows 11 USB Drive
Insert your USB flash drive into an available USB port on your computer.
Run the Windows 11 Installation Media Creation Tool that you downloaded in Step 1. Accept the license terms and conditions. Select “Create installation media for another PC” and click “Next.” Choose the language, edition, and architecture (32-bit or 64-bit) of Windows 11 you want to install. Select “USB flash drive” as the media to use. Choose the USB flash drive you inserted earlier from the list and click “Next.” Wait for the tool to download the necessary files and create the bootable USB drive. This process may take some time depending on your internet connection speed.
Step 3: Configure BIOS/UEFI Settings
Restart your computer and enter the BIOS or UEFI setup utility. This is usually done by pressing a specific key (like F2, F12, ESC, or Delete) during the boot process.
Once in the BIOS/UEFI setup, navigate to the Boot options. Set the boot priority to boot from USB or Removable Devices first. Save the changes and exit the BIOS/UEFI setup.
Step 4: Install Windows 11
Restart your computer with the bootable Windows 11 USB drive inserted. Follow the on-screen instructions to begin the Windows 11 installation process. Choose your language, time, and keyboard preferences, then click “Next.” Click “Install Now” to start the installation.
Enter your Windows 11 product key if prompted. If you don’t have one, you can skip this step for now. Choose the edition of Windows 11 you want to install (Home, Pro, etc.). Accept the license terms and conditions, then click “Next.” Select the installation type. Choose “Custom: Install Windows only (advanced).” Choose the drive/partition where you want to install Windows 11 and click “Next.” Follow the on-screen prompts to complete the installation process. Your computer will restart several times during the installation. Once the installation is complete, you’ll be prompted to set up your user account, password, and other preferences.
Congratulations! You have successfully installed Windows 11 using the Windows 11 USB boot tool.
Upgrading or installing Windows 11 on un-supported laptops or desktops

Installing Windows 11 using Rufus USB Boot Tool
Preparing Windows 11 Installation using the Rufus USB Boot Tool:
System Requirements: Before you start, ensure your system meets the minimum requirements for Windows 11. You can find these on the official Microsoft website.
Download Windows 11 ISO: Obtain the Windows 11 ISO file from the official Microsoft website or other trusted sources.
Download Rufus: Go to the Rufus website (https://rufus.ie/) and download the latest version of Rufus. It’s a free, open-source tool for creating bootable USB drives.
Creating Bootable USB Drive with Rufus:
Plug in USB Drive: Insert your USB flash drive (make sure it has enough capacity to hold the Windows 11 ISO and any other files you may need).
Run Rufus: Open the Rufus application that you downloaded.
Select USB Drive: In Rufus, under “Device,” select the USB drive you want to use. Be careful not to select the wrong drive, as Rufus will erase all data on the selected drive.
Select Windows 11 ISO: Under “Boot selection,” click on “Select” and navigate to the location where you downloaded the Windows 11 ISO file. Select the ISO file.
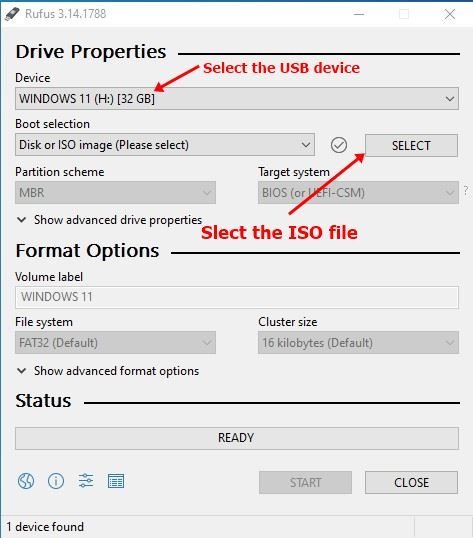
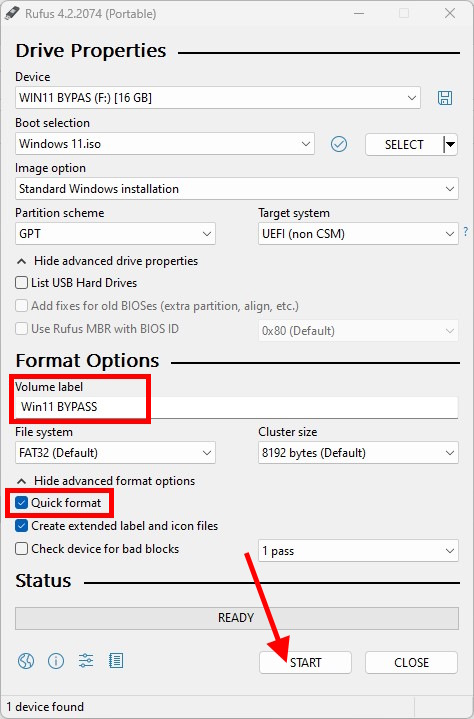
Partition Scheme and File System: For “Partition scheme,” select “GPT” if your system supports UEFI booting, and “MBR” if it supports legacy BIOS booting. For “File system,” select “NTFS” or “FAT32.” Cluster Size: Leave the cluster size as default. Volume Label: You can change the volume label if you want, but it’s not necessary.
Start Creation: Once you’ve configured the settings, click on “Start” to begin creating the bootable USB drive. Rufus may display a warning that all data on the USB drive will be erased. Confirm to proceed.
Wait for Completion: Rufus will now format the USB drive and copy the contents of the Windows 11 ISO onto it. This process may take some time, depending on the speed of your USB drive and your computer.
Completion: Once Rufus finishes, you’ll see a message indicating that the process is complete, and the USB drive is now bootable.
Installing Windows 11 Using Rufus Boot Tool USB:
Boot from USB: Insert the bootable USB drive into the computer where you want to install Windows 11. Restart the computer and enter the BIOS or UEFI settings. Set the USB drive as the primary boot device.
Windows Setup: Save the changes and exit the BIOS or UEFI settings. Your computer should now boot from the USB drive and load the Windows 11 setup.
Follow Installation Prompts: Follow the on-screen prompts to proceed with the installation of Windows 11. You’ll need to select language, time, currency, and keyboard preferences.
Enter Product Key: If prompted, enter your Windows 11 product key. You may also be able to skip this step and enter the key later.
Choose Installation Type: Select “Custom: Install Windows only (advanced)” option.
Select Drive: Choose the drive where you want to install Windows 11 and click “Next.” If needed, you can format or partition the drive from this screen.
Install Windows: Windows 11 will now begin installing on your selected drive. The installation process may take some time, so be patient.
Complete Installation: Once the installation is complete, your computer will restart. Remove the USB drive before it boots back up.
Set Up Windows 11: Follow the on-screen prompts to complete the setup of Windows 11, including creating a user account, setting preferences, and configuring system settings.
Congratulations! You have successfully finished installing Windows 11 using Rufus USB Boot Tool. Your system is now ready to enjoy all the new features and improvements that Windows 11 has to offer.
Contact Us – Find Us On Facebook


